Introduction to Appium
Appium is an open-source tool for automating native, mobile web, and hybrid applications on iOS devices, Android devices, and Windows desktop platforms. It also supports automation tests on physical devices as well as an emulator or simulator both.
Native apps are those kinds of applications that are written using the iOS, Android, or Windows SDKs.
Mobile web apps can be accessed using a mobile browser (Appium supports Safari on iOS devices and Chrome or the built-in ‘Browser’ app on Android devices).
Hybrid apps use a wrapper around a “webview” — a native control that enables interaction with web content.
It offers cross-platform applications testing, i.e. one single API works for Android and iOS platform test scripts.
It has NO dependency on Mobile device OS. APPIUM has a framework or wrapper that translates Selenium Webdriver commands into UIAutomation (iOS) or UIAutomator (Android) commands depending on the device type, not OS type.
Appium supports multiple programming languages such as Ruby, Python, JAVA, JavaScript, C# and PHP.
How does Appium work?

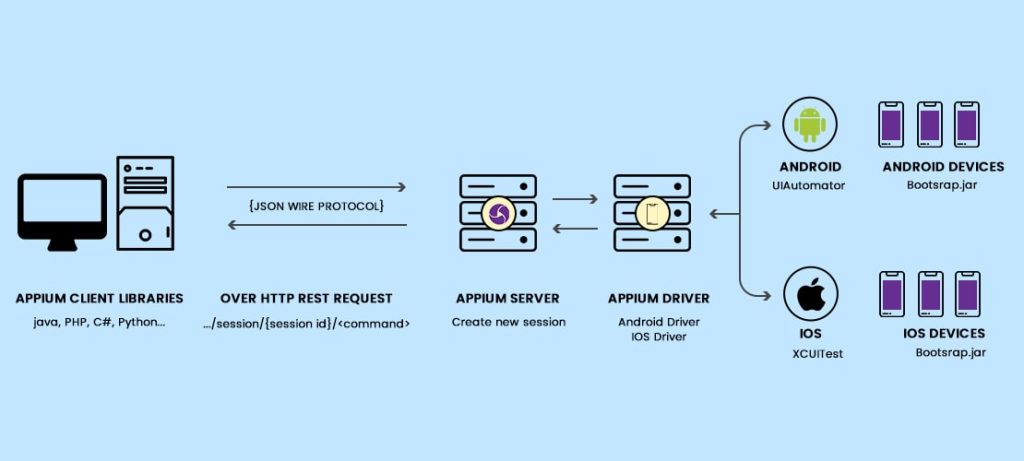
- Appium Server is written in Node.js.
- It uses a client-server architecture.
- The test script can be written in multiple programming languages such as Ruby, Python, JAVA, JavaScript, C# and PHP.
- Client machines communicate with the server via the JSON Wire protocol to begin an automation test session by sending a request to the appium server.
- The Appium Server invokes the iOS or Android drivers by creating a new test automation session.
- The Appium Server ties with the corresponding native testing frameworks to link with the bootstrap.jar/bootstrap.js running on the mobile devices to perform operations on the device.
- Through Appium, it is feasible for testers/developers to use the same test script to test iOS and Android devices.
- However, the problematic point here is to differentiate between iOS and Android devices’ test automation requests. Appium overcomes this by providing the desired capabilities. When a request session is created, the key-value pairs such as deviceName, platformName, appPackage, appActivity etc., have been mentioned. Based on those mentioned key-value pairs, the Appium Server directs the client requests to the corresponding test frameworks.
Appium on Android Devices
- Client machines communicate with the server via the JSON Wire protocol to begin an automation test session by sending a request to the appium server.
- The server checks the desired capabilities. For Android platform testing, the server looks out for the UiAutomator2 – native testing automation framework in Android.
- UiAutomator2 communicates with the bootstrap.jar running on the device as a TCP server. It works on emulators, simulators and real devices as well.
- Bootstrap.jar receives the requests and runs the tests on Android devices. It hands over the test log details to the UiAutomator2 and passes it to the Appium Server. Bootstrap.jar forwards that information to the client.
Appium on iOS Devices
- Client machines communicate with the server via the JSON Wire protocol to begin an automation test session by sending a request to the appium server.
- The server checks the desired capabilities. For iOS platform testing, the server looks out for the XCUITest – native testing automation framework in iOS, which comes with Apple XCode.
- XCUITest communicates with the bootstrap.js running on the device as a TCP server. It works on emulators, simulators and real devices as well.
- Bootstrap.js receives the requests and runs the tests on iOS devices. It hands over the test log details to the XCUITest and passes it to the Appium Server. Bootstrap.js forwards that information to the client.
Getting started
Installing Appium in Mac
- Installation via NPM
Step 1: Install Node.js and check if it is installed using the following commands:
brew install node
node -v
npm -v
Step 2: Install appium and check if it is installed using the following commands:
npm install -g appium
appium -v
Step 3: Install appium client and start appium
npm install wd
appium
Also, install an appium doctor using
npm install appium-doctor -g
For uninstalling appium
uninstall -g appium
- Installation via Desktop App Download
>> Download and install Appium desktop from appium website
Connect real Android device on Mac
Pre-requisites
- Java installed on the system
- JAVA_HOME is set in environment variables, and to check, use command java -version
- An android mobile device
- To connect the mobile device to the computer system, need a cable
Step 1: Download Android SDK
Way 1: Download from android studio
Way 2 :
brew install android-sdk
brew cask install android-sdk
Step 2 : Extract platform-tools folder
sdkmanager "platform-tools" "platforms;android-28"
(the platform-tools will be according to the Android version. Refer: Android version history )
Step 3 : Add environment variables
ANDROID_HOME = path of android-sdk folder
PATH : append the path of platform-tools folder
export ANDROID_HOME=/usr/local/share/android-sdk
echo $ANDROID_HOME
export PATH="/usr/local/Caskroom/android-sdk/4333796/platform-tools:${PATH}"
#Set environment variables Globally on the Mac system use below mentioned command to execute
cd ~/
cat .bash_profile
If bash_profile does not exist
- touch .bash_profilevi .bash_profilePress i
Add the following
# Setting PATH for ANDROID_HOME
export ANDROID_HOME=/usr/local/share/android-sdk
# Adding platform-tools to PATH
PATH="/usr/local/Caskroom/android-sdk/4333796/platform-tools:${PATH}”
Press esc and type
:wq!And press enter
Now ANDROID HOME and PATH are set permanently
echo $ANDROID_HOME
echo $PATH
After this run command
adb devices
Step 4 : Now use mobile android device for automation
Enable developer mode
Enable USB debugging
Step 5 : Connect Android device with computer using usb cable
if asked enable USB Debugging
Step 6 : Run command : adb devices
Check device id is displayed
Frequently Asked Questions
Appium is an open-source framework for automating mobile applications on Android and iOS platforms. It stands out for its cross-platform compatibility, supporting both Android and iOS with a single codebase.
While some programming knowledge is beneficial, Appium supports various programming languages such as Java, Python, and JavaScript. It’s designed to be accessible to users with varying levels of coding expertise.
Appium allows for writing test scripts using a single codebase that can be used for both Android and iOS applications. This simplifies the testing process, making it efficient for developers working on multi-platform projects.
Setting up Appium involves installing Node.js, Appium server, and the necessary mobile device emulators or real devices. The specific requirements may vary depending on the platform, and comprehensive installation guides are available.
Yes, Appium can be integrated with popular testing frameworks such as JUnit and TestNG. Integration allows for better test organization, parallel execution, and seamless integration with CI/CD pipelines.
Appium interacts with mobile apps using the WebDriver protocol. It communicates with the app through the app’s UI elements, making it possible to simulate user interactions like taps, swipes, and text inputs during testing.
Yes, Appium supports testing on real devices as well as emulators. Testing on real devices is crucial for ensuring the app behaves as expected in real-world scenarios, taking into account various device configurations.
Handling different app versions may involve adapting test scripts to accommodate changes in the app’s UI or functionality. Appium provides capabilities to deal with version-specific challenges and supports version-specific testing.

