Mobile app development has become increasingly crucial for businesses to stay competitive in the digital marketplace. With so many platforms and programming languages, deciding the right approach for your app development needs can be challenging. Flutter is a popular choice for mobile app development that is gaining traction in the industry. Google developed this open-source framework, which is highly regarded for its ability to enhance app performance.
This blog will explore Flutter and how it can enhance your app performance. We will delve into the benefits of Flutter app development and examine how it can help you optimize your app’s performance. We will also discuss the differences between native app performance and Flutter app performance and highlight some best practices for Flutter performance optimization. By the end of this blog, you will better understand how Flutter can be used to create high-performing mobile apps that meet the needs of modern users.
How to improve the performance of your Flutter app
Performance is a critical aspect of mobile app development, and Flutter provides many features and tools to help you optimize your app’s performance. By optimizing widget building, using the right state management technique, asynchronous programming, code splitting, and image loading, you can create high-performing Flutter apps that provide an excellent user experience. We will explore some tips and best practices for improving the performance of your Flutter app.

Optimize Widget Building
In Flutter, widgets are the building blocks of an app’s user interface. Efficient widget building can reduce app load times and improve overall performance. This article will explore tips for optimizing widget building in Flutter.
1. Use the const constructor for static widgets
The const constructor creates a widget that can’t be changed, thus reducing the need to rebuild the widget. This is useful for static widgets that don’t need to change throughout the app’s lifetime. For example, if a text widget displays a constant message, you can use the const constructor to create the widget only once.
const Text('Welcome to MyApp');2. Use the Key parameter to reduce widget rebuilds
The Key parameter allows you to uniquely identify a widget, which can help reduce widget rebuilds. When a widget’s fundamental changes, Flutter assumes it has changed and rebuilds it. Using a Key parameter, you can tell Flutter that the widget is the same, even if its properties have changed. This can help reduce the number of widget rebuilds and improve app performance.
class MyWidget extends StatelessWidget { final String text; const MyWidget({Key? key, required this.text}) : super(key: key); @override Widget build(BuildContext context) { return Text(text); } }3. Use the Builder Widget to create complex widgets
The Builder widget can help reduce the number of widget rebuilds by allowing you to create complex widgets that can’t be created using the const constructor. The Builder widget creates a new widget tree whenever its build method is called. This can reduce the number of widget rebuilds by creating a new widget tree only when necessary.
class MyComplexWidget extends StatelessWidget { final List<String> items; const MyComplexWidget({Key? key, required this.items}) : super(key: key); @override Widget build(BuildContext context) { return ListView.builder( itemCount: items.length, itemBuilder: (BuildContext context, int index) { return Builder( builder: (BuildContext context) { return Card( child: ListTile( title: Text(items[index]), ), ); }, ); }, ); }Optimizing widget building in Flutter can help improve app performance. You can create efficient and high-performing Flutter apps using the const constructor for static widgets, the Key parameter to reduce widget rebuilds, and the Builder widget to create complex widgets.

Use the Right State Management Technique
Flutter is known for its efficient state management capabilities. Choosing the right state management technique can significantly impact the performance of your Flutter app. We’ll explore some tips for using the right state management technique to optimize your Flutter app’s performance.
1. Understand the different state management techniques
Flutter provides several state management techniques, including:
- setState: A built-in Flutter method that allows you to update the state of a widget.
- InheritedWidget: A widget that provides data to its children.
- Provider: A package that provides a simple way to manage state across an app.
- BLoC: This pattern separates business logic from UI, using streams to manage state.
Understanding the pros and cons of each technique can help you choose the right one for your app.
2. Use setState wisely
setState is a built-in Flutter method that allows you to update the state of a widget. While it’s a simple way to manage the state, it can quickly become inefficient if overused. To optimize your app’s performance, use setState only when necessary. Instead, consider using more advanced state management techniques like Provider or BLoC.
3. Use InheritedWidget for simple data sharing
InheritedWidget is a widget that provides data to its children. It’s a simple and efficient way to share data across an app. However, it’s best suited for simple data sharing, like sharing a theme or localization data. For more complex state management, consider using Provider or BLoC.
4. Use a Provider for medium-sized apps
Provider package provides a simple way to manage state across an app. It’s an efficient and easy-to-use state management technique well-suited for medium-sized apps. The provider uses a reactive programming approach, meaning that widgets are rebuilt only when necessary, which helps improve app performance.
5. Use BLoC for complex apps
BLoC (Business Logic Component) is a pattern that separates business logic from UI, using streams to manage state. It’s a powerful state management technique that’s well-suited for complex apps. BLoC can help improve app performance by reducing the number of widget rebuilds and improving code organization.
Choosing the right state management technique is crucial for optimizing your Flutter app’s performance. You can create high-performing Flutter apps by understanding the different state management techniques, using setState wisely, and choosing the right technique for your app’s complexity.
Use Asynchronous Programming
Asynchronous programming is an essential technique for optimizing the performance of your Flutter app. It allows your app to perform multiple tasks simultaneously, reducing wait times and improving overall performance. This article will explore tips for using asynchronous programming in Flutter to enhance your app’s performance.
1. Use FutureBuilder for asynchronous tasks
FutureBuilder is a built-in Flutter widget that allows you to perform asynchronous tasks in the background while displaying a loading indicator on the UI. Once the task is complete, it returns the data to the UI, updating it with the necessary information. Using FutureBuilder can help reduce wait times and enhance your app’s performance.
2. Use async and await for long-running tasks
Long-running tasks like network requests or file operations can slow your app’s performance. Using the async and await keywords can help speed up these tasks by allowing your app to perform other operations while waiting for a response. This helps keep your app responsive and enhances user experience.
3. Use Isolates for CPU-intensive tasks
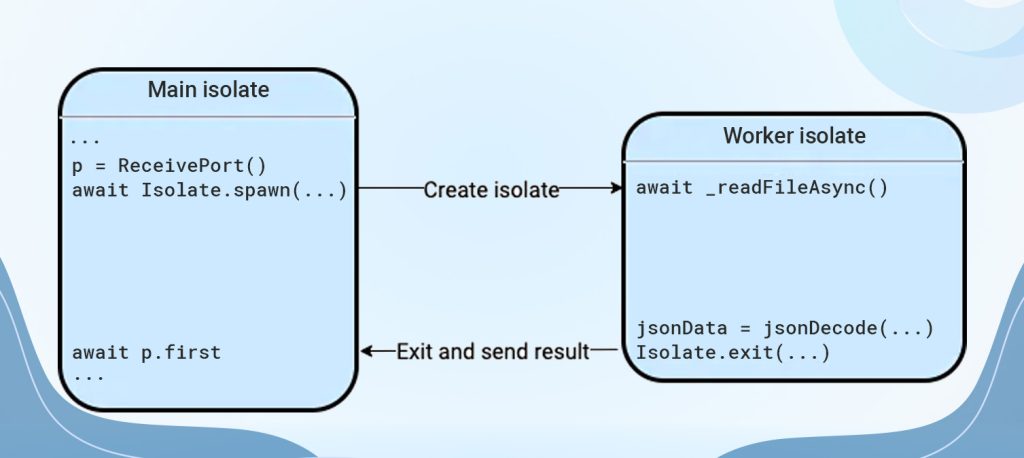
Isolates are a powerful feature in Flutter that allows your app to run CPU-intensive tasks in the background without affecting the UI’s performance. By running these tasks in a particular isolate, your app can remain responsive while performing complex operations, improving overall performance.

4. Use Streams for real-time updates
Streams are a powerful feature in Flutter that allows you to receive real-time updates from data sources, such as databases or network requests. This can be extremely useful for apps requiring real-time updates, such as chat or social media. Streams can reduce wait times and enhance your app’s performance.
5. Use the compute function for CPU-intensive operations
The compute function is a built-in Flutter function that allows you to perform CPU-intensive operations in the background without affecting the UI’s performance. By running these operations in a particular isolate, your app can remain responsive while performing complex operations, improving overall performance.
Asynchronous programming is crucial for optimizing your Flutter app’s performance. By using FutureBuilder for asynchronous tasks, async and await for long-running tasks, Isolates for CPU-intensive tasks, Streams for real-time updates, and the compute function for CPU-intensive operations, you can create high-performing Flutter apps that enhance user experience.
Use Code Splitting
Code splitting is a technique used to optimize the performance of your Flutter app by splitting the codebase into smaller, more manageable chunks. This allows the app to load only the necessary code, reducing load times and improving overall performance. Let’s explore some tips for using code splitting in Flutter to enhance your app’s performance.
1. Split your code into smaller modules.
The first step in code splitting is to split your app’s code into smaller modules that can be loaded separately. This can be done by dividing your app’s functionality into logical modules like login, profile, and settings. By splitting your code into smaller modules, your app can load only the necessary code, reducing load times and improving overall performance.
2. Use dynamic imports
Dynamic imports are a Flutter feature that allows you to load code on demand rather than loading all the code up front. This can be done using the ‘import’ function with a path to the module you want to load dynamically. Using dynamic imports, your app can load code as needed, reducing load times and improving overall performance.
3. Use lazy loading
Lazy loading is a technique that delays code loading until it’s needed. This can be done using the ‘deferred’ keyword with the ‘import’ function. Using lazy loading, your app can load code only when needed, reducing load times and improving overall performance.
4. Use on-demand loading
On-demand loading is a technique used to load code only when needed. This can be done using the ‘runApp’ function with a callback that loads the necessary code. Using on-demand loading, your app can load code only when needed, reducing load times and improving overall performance.
Code splitting is an essential technique for optimizing your Flutter app’s performance. By splitting your code into smaller modules, using dynamic imports, lazy loading, on-demand loading, and caching, you can create high-performing Flutter apps that enhance user experience.
Optimize Image Loading
Images are crucial in mobile app development and can significantly impact performance. In this article, we’ll explore some tips for optimizing image loading in Flutter to enhance your app’s performance.
1. Use smaller images
The image file size is one of the most essential factors in determining how quickly an image loads. To optimize image loading in your Flutter app, use images as small as possible without sacrificing quality. This can be achieved by compressing images and reducing their resolution to match the size at which they will be displayed in your app.
2. Use lazy loading
Lazy loading is a technique used to delay the loading of images until they’re needed. This can be done using the ‘FadeInImage’ widget, which loads an image placeholder until the actual Image is loaded. Using lazy loading, your app can load images only when needed, reducing load times and improving overall performance.
3. Use image caching
Caching is a technique that stores previously loaded images in memory, allowing the app to load them faster the next time they’re needed. This can be done using a caching mechanism such as the ‘AssetCache’ or ‘MemoryImageCache’ class. Using image caching, your app can load images faster, reducing load times and improving overall performance.
4. Use the right image format
Choosing the correct image format is critical for optimizing image loading in your Flutter app. The most commonly used image formats in mobile app development are JPEG, PNG, and WebP. JPEG is best suited for photographs, PNG is ideal for transparent images, and WebP is a newer format offering better compression than JPEG and PNG.
5. Use the right network image loading package
Several network image-loading packages are available in Flutter, such as ‘Image. Network’ and ‘CachedNetworkImage.’ Choosing the right package for your app is essential based on its requirements. For example, ‘CachedNetworkImage’ provides a caching mechanism for network images, which can significantly improve performance.
Optimizing image loading is an essential aspect of Flutter app development. By using smaller images, lazy loading, Image caching, the correct image format, and the right network image loading package, you can significantly improve your app’s performance and enhance user experience.
Conclusion
Optimizing the performance of your Flutter app is essential to provide users with a smooth and seamless experience. With the tips and techniques explored in this article, you can supercharge your Flutter app and enhance its performance in various ways. So, take the time to implement these performance optimization techniques in your Flutter app, and watch as your app’s performance improves and your users enjoy a better experience.
Optimizing a Flutter app requires technical expertise and experience. Therefore, working with a leading Flutter app development company or hiring a skilled developer can be a great solution to optimize your app’s performance. Partnering with a leading Flutter app development company or skilled developer can help you optimize your app’s performance, improve its speed and responsiveness, and provide a better user experience. So, consider working with experts to hire a dedicated Flutter developer to ensure the success of your app.
Frequently Asked Questions
Performance optimization is crucial for ensuring that your Flutter app runs smoothly and provides a positive user experience. It impacts factors like loading times, responsiveness, and overall efficiency of your app.
You can use Flutter DevTools, profiling tools, and monitoring app metrics to identify performance bottlenecks. Look for issues such as slow rendering, high CPU usage, and memory leaks.
Common techniques include optimizing widget trees, reducing unnecessary rebuilds, using const constructors, lazy-loading assets, and minimizing the use of expensive operations in the UI thread.
Asynchronous programming is crucial for keeping your app responsive. Use asynchronous functions and futures for time-consuming operations to prevent blocking the UI thread.
Optimize images by using the appropriate image format, compressing images, and loading images asynchronously. Utilize packages like cached_network_image for efficient network image loading.
Efficient state management is crucial for Flutter performance. Choose the right state management solution for your app, consider using provider patterns, and avoid unnecessary rebuilds.
Yes, Flutter provides tools like DevTools for monitoring app performance, identifying bottlenecks, and analyzing memory usage. It’s an essential resource for optimizing your Flutter app.

Looking for a Flutter Developer for Your Next Project?

Pooja Upadhyay
Director Of People Operations & Client Relations


