


Drupal and Ghost are two powerful platforms that serve very different needs in the content management system (CMS) landscape. Drupal, an open-source CMS, has long been favoured by developers for its robust flexibility, complex content models, and ability to handle large-scale websites. Versions 8, 9, and 10 of Drupal have brought significant improvements in performance, security, and usability. However, as businesses and individuals increasingly seek faster, lighter, and more user-friendly platforms for blogging and content publishing, the need for migration from Drupal to other platforms is growing.
On the other hand, Ghost is rapidly emerging as a streamlined and modern CMS focused primarily on publishing and blogging. Unlike Drupal, which serves multiple purposes, Ghost is optimized for performance, speed, and ease of use, making it an ideal choice for bloggers, independent publishers, and small businesses. Ghost’s minimalistic design, intuitive interface, and powerful SEO features make it a compelling choice for those focused on content creation rather than extensive customization.
A Look at Drupal
Drupal powers 2.3% of websites worldwide and is often the go-to choice for government portals, educational institutions, and media companies. Its architecture allows for a high degree of customization, multi-language support, and vast community-driven modules. However, this complexity comes at the cost of requiring deeper technical expertise for both setup and maintenance.
Some key statistics for Drupal:
- Market share: Around 1.2% of all CMS-powered websites globally.
- Drupal users: More than 1.3 million users actively contribute to the community.
- Versions supported: Currently, versions 8, 9, and 10, with each version offering enhanced features but also adding to the technical demands.
A Look at Ghost
In contrast, Ghost is specifically built for speed, user-friendliness, and content publishing, gaining popularity in the CMS world due to its simplicity and performance. Ghost currently powers around 0.2% of websites globally, a small but steadily growing community. Built on Node.js, Ghost excels at fast load times and is particularly well-suited for SEO and modern publishing workflows.
Some key statistics for Ghost:
- Market share: 0.1% globally, though gaining traction among digital publishers.
- Performance: Ghost has built-in SEO tools, AMP support, and fast loading times thanks to its lightweight framework.
- Target users: Bloggers, journalists, content creators, and digital marketers seeking a streamlined CMS focused on publishing.
Source: w3techs.com & themeisle.com
Why Migrate Your Blogs from Drupal to Ghost?
Both Drupal and Ghost are highly capable platforms, but they cater to different needs. While Drupal is a multipurpose, highly customizable CMS known for handling complex sites with multifaceted content models, Ghost focuses specifically on professional content publishing. If your primary goal is to run a blog or content-centric business, Ghost offers a more streamlined, intuitive experience tailored for modern publishers.
Ghost comes equipped with built-in features to help you create, share, and monetize content, from managing memberships and newsletters to offering paid subscriptions. In contrast, Drupal’s flexibility can sometimes add complexity, especially when your needs are limited to working on a blog or content-focused site.
Ghost’s native tools make it easy to publish content, manage SEO, and grow an audience without the technical overhead often associated with Drupal. For instance, Ghost integrates modern publishing features such as:
- Inbuilt newsletter and email marketing support, allowing you to engage directly with your audience.
- Member subscriptions and paid content provide seamless ways to monetize your blog.
- Clean, fast, and mobile-friendly themes designed for speed and readability.
Step-by-Step Guide to Migrate Your Blogs From Drupal 8, 9, or 10 to Ghost
Content Migration Process
While Drupal’s extensibility is well-known, migrating content from Drupal to Ghost is essential if your focus is on speed, simplicity, and modern publishing tools. Ghost supports content import from platforms like Substack, Medium, and MailChimp and offers flexible import options with JSON and ZIP file uploads through Settings > Advanced > Labs section under Import content.
However, since Drupal does not have a direct import tool in Ghost, you’ll need to follow a more hands-on process:
- Export your content from Drupal in a structured format (HTML).
- Convert the content into Mobiledoc, Ghost’s JSON-based format designed for optimized publishing.
- Use Ghost’s Labs Import Content tool to upload your blog posts into the Ghost CMS.

By leveraging Ghost’s Mobiledoc format, your content gets stored in a standard that is fast, responsive, and compatible with Ghost’s robust publishing engine. While it requires a bit of conversion work, the end result is a blog site that is fast, modern, and ready for today’s content-driven web landscape.
Importing Format
The JSON file used for importing content into Ghost should contain both data and meta objects, with an optional outer db key wrapping them. The meta-object includes details such as the version of Ghost and a timestamp, while the data object holds a structured list of posts, tags, users, posts_tags, and other relevant entities for your blog content. This ensures that all necessary components are transferred correctly during the import process.
| { “db”: [ “meta”: { “exported_on”:1408552443891, “version”:”5.75.2″ }, “data”: { “posts”: [{…}, …], “tags”: [], “users”: [], “posts_tags”: [], “posts_authors”: [], “roles_users”: [] } ] } |
For more detailed information, you can refer to Ghost’s official documentation
To successfully import a valid post with content and a specific publication date, the essential fields required are title, mobiledoc, status, and published. Since generating a mobiledoc format for Drupal content is not feasible, you can use the HTML property to input your blog content instead. This approach ensures that the content is accurately passed to Ghost.
| { “posts”: [ { “title”: “Sample Post”, “slug”: “sample-post”, “html”: “<p>This is a sample post content with <strong>HTML</strong> formatting.</p>”, “status”: “published”, “author”: “Author Name”, “created_at”: “2023-10-01T00:00:00.000Z”, “updated_at”: “2023-10-01T00:00:00.000Z” } ] } |
To include a featured image with your post, you can specify the image file name using the feature_image, feature_image_caption, and feature_image_alt properties. Then, upload the JSON file along with the image by compressing them together into a ZIP file for import.


Preparing and Exporting Text and HTML Content
To export the content of your blog, you’ll need to use an acceptable format. A simple PHP script or a custom module can be employed to generate the required JSON file. However, this is just the first step. You’ll also need to convert the exported HTML and text into Mobiledoc format, as well as update image paths (which we’ll cover in the upcoming sections).
Below is an example of a PHP script that can be used to generate a JSON file for blog content. The HTML content can be captured using the View Builder, and tags can be collected from a taxonomy reference field called “Tags.” This sample demonstrates how to create an importable JSON file that includes both tags and posts.
| use Drupal\Core\File\FileSystemInterface; // Query to get all published articles $query = $entity_type_manager->getStorage(‘node’)->getQuery() ->condition(‘type’, ‘blog’) ->condition(‘status’, 1); $nids = $query->execute(); // Load the nodes using the entity type manager $nodes = $entity_type_manager->getStorage(‘node’)->loadMultiple($nids); // store posts array $posts = []; // loop through the nodes and populate the array foreach ($nodes as $node) { // convert the date time fields into ISO8601 format $published_at = convertUnixToISO8601($node->getCreatedTime()); $created_at = convertUnixToISO8601($node->getCreatedTime()); $updated_at = convertUnixToISO8601($node->getChangedTime()); $posts[] = [ ‘id’ => $node->id(), ‘title’ => $node->getTitle(), ‘slug’ => $node->get(‘path’)->alias, ‘html’ => $node->body->value, ‘status’ => ‘published’, ‘published_at’ => $published_at, ‘created_at’ => $created_at, ‘updated_at’ => $update_at, ]; } $data = [ ‘meta’ => [ ‘exported_on’ => time(), ‘version’ => ‘5.75.2’, ], ‘data’ => [ ‘posts’ => $posts, ], ]; $json_data = json_encode($data, JSON_PRETTY_PRINT); // Save to file $file_path = ‘public://ghost_import.json’; file_save_data($json_data, $file_path, FileSystemInterface::EXISTS_REPLACE); |
When importing date and time values, they need to be converted to ISO 8601 format. In the example provided, a custom method called convertUnixToISO8601 was used for this conversion. Below is the method definition to accomplish this task.
| function convertUnixToISO8601($timestamp) { // Create a DateTime object from the Unix timestamp $date = new DateTime(); $date->setTimestamp(intval($timestamp)); // Convert the DateTime object to ISO 8601 format return $date->format(DateTime::ATOM); // ATOM is the same as ISO 8601 } |
The sample code provided creates a JSON file containing information from the ‘blog’ content type. It retrieves the HTML content of the node from the body field. However, if your content type includes multiple fields and you want to capture the HTML from a specific view mode, you can use a different approach.
The example below demonstrates how to fetch the HTML content using the full_content view mode. You can use any existing view mode or create a custom one to tailor the output to your requirements.
| // fetch view builder object $view_builder = \Drupal::entityTypeManager()->getViewBuilder(‘node’); // get render array from the view mode ‘Full Content’ $render_array = $view_builder->view($node, ‘full’, ‘en’); $build = [‘#markup’ => $render_array]; // renderer object $renderer = \Drupal::service(‘renderer’); $html_output = $renderer->renderPlain($render_array); |
If we need to include meta tag fields or derive meta titles and descriptions from other fields, we can incorporate this into our sample code. It’s important to limit the length of these meta values, as exceeding the character limit may cause errors during the upload process.
| …’meta_title’ => substr($node->get(‘field_meta_tags’)->title, 0, 70), ‘meta_description’ => substr($node->get(‘field_meta_tags’)->description, 0, 150),… |
Adding Tags and Associating Them with Posts
We can include tags in our JSON file alongside posts, specifying their name, slug, and ID. To associate tags with posts, we need to link them within the posts_tags key using post_id and tag_id.
The example below illustrates a JSON export featuring one post and one tag, both with an ID of 1. The post and tag are connected under the posts_tags key using their respective IDs.
| { “posts”: [ { “id”: “1”, “title”: “Sample Post”, “slug”: “sample-post”, “html”: “<p>This is a sample post content with <strong>HTML</strong> formatting.</p>”, “status”: “published”, “created_at”: “2023-10-01T00:00:00.000Z”, “updated_at”: “2023-10-01T00:00:00.000Z” } ], “tags”: [ { “id”: “1”, “slug”: “drupal-development”, “name”: “Drupal Development” } ], “posts_tags”: [ { “post_id”: “1”, “tag_id”: “1” } ] } |
Example:
Suppose our content type “blog” includes a taxonomy reference field with the machine name field_blog_tags. We can collect all reference terms and add them as tag entries.
We can then update our sample code to include both tag entries and posts_tags entries.
| use Drupal\Core\File\FileSystemInterface; // Get the entity type manager service $entity_type_manager = \Drupal::entityTypeManager(); // Query to get all published articles $query = $entity_type_manager->getStorage(‘node’)->getQuery() ->condition(‘type’, ‘blog’) ->condition(‘status’, 1); $nids = $query->execute(); // Load the nodes using the entity type manager $nodes = $entity_type_manager->getStorage(‘node’)->loadMultiple($nids); // posts list $posts = []; // tags list $tags = []; // keep found tag ids to avoid duplicates $used_tag_tids = []; // an array to store post and tag one to one association $posts_tags = []; foreach ($nodes as $node) { // convert the date time fields into ISO8601 format $published_at = convertUnixToISO8601($node->getCreatedTime()); $created_at = convertUnixToISO8601($node->getCreatedTime()); $updated_at = convertUnixToISO8601($node->getChangedTime()); $posts[] = [ ‘id’ => $node->id(), ‘title’ => $node->getTitle(), ‘slug’ => $node->get(‘path’)->alias, ‘html’ => $node->body->value, ‘status’ => ‘published’, ‘published_at’ => $published_at, ‘created_at’ => $created_at, ‘updated_at’ => $updated_at, ]; $tags_terms = $node->get(‘field_blog_tags’)->referencedEntities(); foreach ($tags_terms as $term) { if(!in_array($term->id(), $used_tag_tids)) { $used_tag_tids[] = $term->id(); $tags[] = [ ‘id’ => $term->id(), ‘name’ => $term->getName(), ‘slug’ => $term->toUrl()->toString(), ]; } $posts_tags[] = [ ‘post_id’ => $node->id(), ‘tag_id’ => $term->id(), ]; } } $data = [ ‘meta’ => [ ‘exported_on’ => time(), ‘version’ => ‘5.75.2’, ], ‘data’ => [ ‘posts’ => $posts, ‘tags’ => $tags, ‘posts_tags’ => $posts_tags, ], ]; $json_data = json_encode($data, JSON_PRETTY_PRINT); // Save to file $file_path = ‘public://ghost_import.json’; file_save_data($json_data, $file_path, FileSystemInterface::EXISTS_REPLACE); |
The example above includes tags derived from the taxonomy terms referenced by our nodes.
Images
If our node includes an image field or any other image that we want to use as a featured image for our posts, we can assign it to the feature_image key. Here, we need to provide the file name (base name only, without the path) and include values for the alt text and caption.
| … ‘feature_image’ => $featured_image_file_name, ‘feature_image_alt’ => $featured_image_alt, ‘feature_image_caption’ => $featured_image_caption, … |
Please note that the file names referenced in the feature_image key must be included in the upload along with the JSON file. These files can be archived in a zip file with the JSON. For example, if one of the images is named “image_1.png,” your zip file should be organized as follows:
Upload-zip/
- ghost_import.json
- image_1.png
Now that we have the JSON file with the post data, we need to update the image file paths. For instance, if Drupal stores images and files under /sites/default/files, you’ll need to change these paths to content/images, as Ghost stores images in this directory.
You can accomplish this by adding a string replace function in your code or by modifying the paths directly within the file.
We can easily implement this in our sample code using a string replace function or a similar method.
| … $html_output = str_replace(‘sites/default/files’, ‘content/images’, $html_output); … |
Finally, as part of the upload process, you should zip the sites/default/files directory into content.zip, which will place your images inside the content/images folder. Once you upload your content.zip, the image links will work by retrieving the files from Ghost. The structure of your upload zip should look like this:
- content.zip/
- Images/
- Image1.jpg
- 2024-09/
- Image_101.png
- etc.
- Images/
Mobiledoc
As mentioned earlier, Ghost stores content in the Mobiledoc format. If you upload a JSON file containing only HTML, the posts may lose their HTML structure. This might be acceptable for a blog with mostly text and minimal formatting, but to preserve the markup structure, you need to first convert the HTML in your JSON file to Mobiledoc format.
You can use Ghost’s Migrate CLI tool to perform this conversion. Follow these steps:
- Ensure Node.js 18 is installed on your machine.
- Install the migration tool with npm install @tryghost/migrate -g.
- Run the command migrate json-html-card /path/to/your/export.json to convert the content in your JSON file to Mobiledoc format.
- Check the output file to confirm that the mobiledoc property and value have been added.
Custom JavaScript and CSS
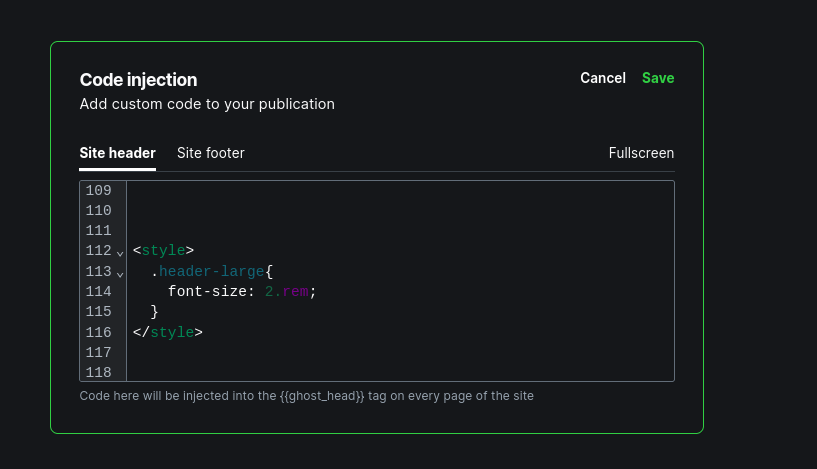
If your imported content is missing styles or behavior, it is likely due to missing JavaScript or CSS. To add custom CSS or JavaScript to your posts, you can use the Inject Code functionality to include it in the header or footer of your post pages.
You can find this option under Settings > Advanced > Code Injection.
Alternatively, if your CSS or JavaScript code is extensive, you can add links to external .js or .css files instead of including the code directly.
Concluding Steps:
After exporting and converting the JSON file to Mobiledoc format, you need to upload it using the content importer form. You can find this form under Settings > Advanced > Labs > Import Content.

- If your JSON file includes a value for the feature_image key, create a zip file containing both the images and the JSON file for upload to ensure that the feature images are properly loaded. Additionally, replace the image paths within your HTML markup with “content/images.”
- To upload your images, zip the sites/default/files directory as content_images.zip.
- For any further customizations, you can modify Ghost’s theme files; more information on this can be found here.
- After submitting your upload, you will receive an email notification indicating whether the upload was successful.
- We can develop an exporter solution as a custom module, and we can also adjust the syntax of our sample code to match Drupal 7 if exporting content from a Drupal 7 site to Ghost.
Conclusion:
As a top-notch Drupal development company, we can make moving your site from Drupal to Ghost much easier. I will start by checking out your current site and making a plan for the move. We optimize your new site to run smoothly and set up SEO and analytics to track your site’s performance. This ensures a smooth transition with minimal hassle and keeps your site looking great. Our expert Drupal developers offer training on how to use Ghost and provide support if any problems come up later.
Want to migrate your Drupal website? Our Drupal migration experts will help you.

Pooja Upadhyay
Director Of People Operations & Client Relations